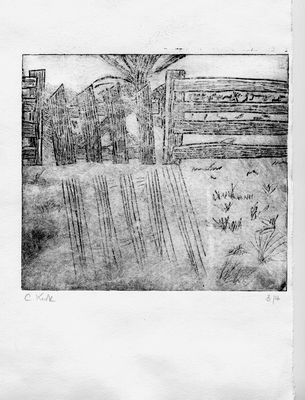
For this print, taken from one of my earlier sketches, I used a piece of intaglio printing card (it has a sort of shiny, plastic surface). Using the edge of a glue spatula (which was all I had to hand, but wasn’t an ideal tool) I carved the design into the card. I then scraped a thin layer of oil based intaglio printing ink across the whole plate and then blotted most of it off again with rags and torn pages from a yellow pages, leaving ink in the grooves and some ink on the surface of the card. The method of printing is the same as for collagraph i.e. soak a piece of heavyweight paper and then blot the excess water off it. Place a registration sheet on a piece of protective newspaper on the printing press. (The registration sheet is a template of the same size as the paper you will print on that marks out where you need to put the plate to ensure prints are positioned correctly. Sadly I didn’t use one for this as I was just testing the plate.) Lay the plate face up onto the registration sheet, place the damp paper over, lining up edges with the registration sheet, cover with newspaper and then the blankets and run through the press. Voila!
I learned that:
a) you need to leave quite a lot of ink on, and be careful not to rub it back out of the design; and
b) it is good to use a variety of cutting tools so that you get a variety of lines.
Another really interesting effect. I just went to see an exhibition that included several collagraphs, and I wasn’t sure what they were!
Thank you, Dave.
A collagraph print is made from a plate created by collaging materials that produce texture e.g. sandpaper, foil, plastic, fabric, string, sand etc. You glue the materials onto a piece of heavy card to create your design and then varnish the plate with shellac (French Polish). Oil based ink is then applied across the whole plate and rubbed off – and the rest of the process is as described above for drypoint. You get some very interesting prints from this technique, as you will have seen!
Thanks.
Just wanted to let you know, since I enjoy your blog, I have tagged you. If you don’t already know about it you can follow the link to my blog: http://mothsblog.blogspot.com/2007/05/ive-been-tagged.html
Hello Carole,
I was curious about the “intaglio printing card”, I am unfamiliar with this material. Is this plastic a commonly used material? Do others use it for the drypoint method as you described?
Also,
Some collographs I’ve seen are printed as embosment only (without ink). Though I have not made a collograph I have read about a method in which a plastic plate is softened with the aid of a solvent and then molded to have texture and dimension. The description of this method also mentioned that found objects could be pressed into the mailable plastic. Collographs seem to me like a very natural bridge between sculpture and printmaking.
Happy Printing,
Alan Takach
Takach Press Corporation
Alan, I’m not sure if I’ve got the right name for it, but my tutor called it ‘Intaglio printing card’. It is white card, about the thickness of cereal box card, and with a thin plastic coating on one side of it. It comes in sheets, about A2 size. You can make marks in it to create a drypoint plate, as I did on the gate piece. You can tear it to create interesting dark edges to the plate. You can also bend, fold or crumple it, which creates interesting fractured lines on the plate. I’ve combined this with chine colle (http://www.carolekirk.com/?p=210) and also collagraph by sticking objects onto the torn card. It’s quite versatile. I don’t know how commonly used it is outside of my college, as I’m quite new to printmaking. I hadn’t come across it before. You can’t make very many prints with it though, as it breaks down quite quickly.
Thanks for the information about plastic plate/collagraphs. I hadn’t come across that technique before.
Thanks for visiting!
Hi Carole, I am doing dry point etching on plastic and not having the success as I was hoping for. I am using the exactly same technique mentioned above but am failing to get a deep print. I am using overhead plastic sheets, is this too thin? How deep does the scoring need to be?
Hi Ben,
Do you mean overhead transparencies? I would imagine they would be too thin, as you do need to score a deep enough line to raise a ‘burr’ (the rough bit at the edges of the scored line), as it is the burr that holds the ink with drypoint. I have just (only yesterday, funnily enough!) tried out a perspex plate which is probably about 1mm thick. I scratched into it using an inexpensive drypoint tool with a sharp point. I ordered a drypoint starter kit from magentasky.com, and I’m happy with the results (and you don’t need a press!) You can also buy accessories directly from GreatArt.com
Happy etching!
I’m looking to purchse a starter kit for dry point – complete beginner – have tried accessing the websites you’ve mentioned with no luck and the terms you used don’t seem to be recognised – would you inform me whatI need and where I can buy it
Sarah